A detailed, English-Korean description of all the icons you can see in Zoom and the features you can use. However, this documentation is primarily based on use on a PC. (줌에서 볼 수 있는 모든 아이콘과 사용할 수 있는 기능에 대한 상세한 영어-한글 설명입니다. 단, 이 설명서는 주로 PC에서의 사용을 기준으로 하였습니다.)
Features that are useful for Point English students or teachers are colored separately. (포인트영어 수강생 또는 선생님에게 유용한 기능은 별도 색으로 표시하였습니다.)
Contents (목차)
- 0. Installment (설치)
- 1. Home (홈)
- 2. Meeting (회의)
- 3. Team Chat (팀 채팅)
- 4. Scheduler (스케줄러)
- 5. Docs = Documents (문서)
- 6. More (더 보기)
- 7. Frequently Asked Questions (자주 묻는 질문)
0. Installment (설치)
0-1. App Installment in PC (PC에 앱 설치)
- Download Zoom App of English Version↓
Most computers these days are [download (64-bit)]. (요즘 대부분은 컴퓨터는 [다운로드 (64-bit)]입니다.)
- 한글 버전 줌 다운로드↓
Meeting participants do not need to sign up after installing Zoom; only the meeting creator does. (미팅 참가자는 줌 설치 후 회원 가입이 필요하지 않습니다. 회의 생성자 만 필요.)
0-2. App Installment in Mobile Phone (모바일 폰에 앱 설치)
Go to the Play Store on your Android phone or the App Store on your iOS phone, search for “Zoom” and hit the [Install] button. (안드로이드 폰은 플레이 스토어에서, iOS 폰은 앱 스토어에 들어 가셔서 ‘줌’ 을 검색하셔서 [설치] 버튼을 누르시기 바랍니다.)
>>>>>>>>>>>>>>>>>>>>>>>>>>>
1. Home (홈)
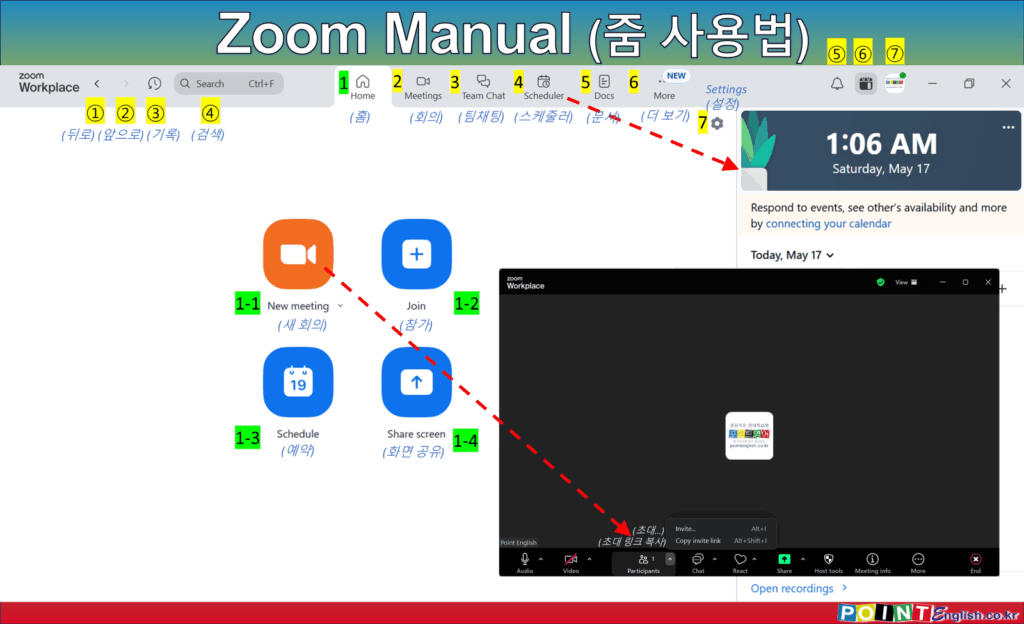
In home menu, you can make instant new meetings, book meetings etc. (홈 메뉴에서 즉시 새 회의와 회의 예약 등을 할 수 있습니다.)
① Back (뒤로)
- Go to the previous working page. (이전 작업 페이지로 이동합니다.)
② Forward (앞으로)
- Move to the next page in navigation history. (탐색 기록에서 다음 페이지로 이동합니다.)
③ History (기록)
- View recent meetings and actions taken. (최근 회의 및 수행한 작업을 확인합니다.)
④ Search (검색)
- Find contacts, meetings, and messages. (연락처, 회의 및 메시지를 검색합니다.)
⑤ Open activity center (활동 센터 열기)
- Access notifications and recent interactions. (알림 및 최근 상호작용을 확인합니다.)
⑥ Open calendar side panel (캘린더 사이드 패널 열기)
- If you click on it, calendar side panel opens in right and you can see upcoming meetings and schedules. (클릭하면, 오른 쪽에 캘린더 사이드 패널이 열리고, 다가오는 회의 및 일정을 확인할 수 있습니다.)
⑦ Profile (프로필)
- Show available/unavailable status. (대화 가능/불가능 상태를 표시합니다.)
1-1. New meeting (새 회의)
Start an instant meeting with default settings. (기본 설정으로 즉시 회의를 시작합니다.)
Click ‘New meeting’ icon and the meeting will start immediately. (‘새 회의’ 아이콘을 클릭하면 회의가 바로 시작합니다.)
When Zoom Workplace window opens, you can invite attendees by email by tapping the ^ button to the right of the participants, or copy the invitation link. (줌 작업창이 열리면 참가자 우측의 ^ 버튼을 눌러 이메일로 참석자를 초대하거나, 초대 링크를 복사할 수 있습니다.)
On the right side of ‘New meeting’, you can select the options below by pressing the v sign. (‘새 회의’ 우측은 v 표시를 눌러 아래 옵션을 선택할 수 있습니다.)
- Start with video (비디오로 시작)
- Use my personal meeting ID (PMI) 123 456 7890 (읽지 않은 상태로 표시)
1-2. Join (참가)
Enter a meeting ID or link to join an existing meeting. (회의 ID 또는 링크를 입력하여 기존 회의에 참가합니다.)
※ This is unnecessary as most people will click the link to go directly to the meeting room. (대부분 링크를 눌러 회의실로 바로 가므로 필요 없는 기능입니다.)
1-3. Schedule (예약)
Set up a future meeting with specific date, time, and participants. (특정 날짜, 시간 및 참가자를 설정하여 향후 회의를 예약합니다.)
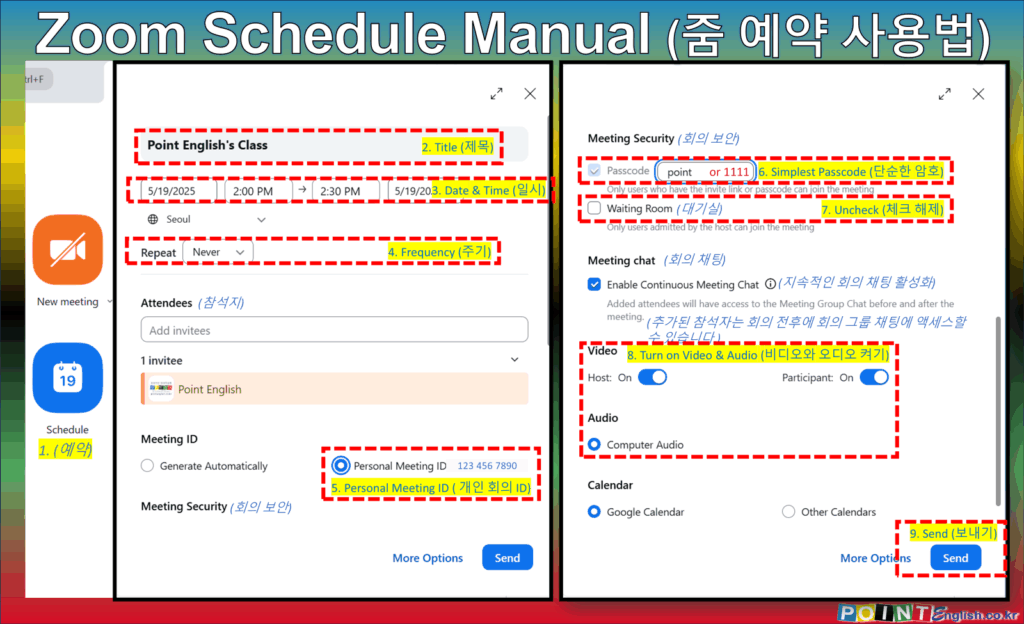
1-3-1. How to create a regular meeting (= class) (정기적인 회의를 만드는 방법 (= 수업))
The following are guidelines for repeating classes. (아래 안내는 반복되는 수업을 위한 가이드라인입니다.)
- Click ‘Schedule’ icon! (‘예약’ 아이콘 클릭!)
- Change Tittle! (제목 변경!)
- Choose Date & Time! (날짜와 시간 선택!)
- 주기 선택! (Choose Frequency!) – A number of options. Choose a ‘Repeat’ cycle if you want to connect to your Google Calendar, etc. to receive an alarm. If you’re just using the room, you can select ‘Never’ as you can use the link you created once. (다양한 옵션이 있습니다. 구글 캘린더 등과 연결해서 알람을 받고 싶으면 반복 주기를 선택하세요. 단순히 회의실 사용 용도라면 한번 만든 링크를 계속 사용할 수 있으니 ‘안 함’을 선택해도 됩니다.)
- Check on ‘Personal Meeting ID‘! (‘개인 회의 ID‘ 선택) – This is to reuse the meeting link in the future. (추후 회의 링크를 재사용하기 위함입니다.)
- For reuse, change the passcode to something as easy to memorize and type as possible, such as point or 1111. (반복 입력을 위해서 암호는 point나 1111 같은 최대한 외우고 입력하기 쉬운 암호로 바꿉니다.)
- Do not check ‘Waiting Room’. 대기실은 체크하지 않습니다.
- Turn on Video & Audio. (비디오와 오디오 켜기.)
- Click ‘Send’! (‘보내기’ 클릭!)
1-3-2. How to invite participants (= students) (참석자 (= 학생) 초대하는 방법)
Explained in 2-1 below. (아래 2-1에서 설명.)
Share your screen with participants during a meeting. (회의 중 참가자와 화면을 공유합니다.)
※ This is unnecessary function because you can use share screen in the middle of meeting. (회의 중에 사용하는 기능으로 이 바로가기 기능은 의미가 없습니다.)
>>>>>>>>>>>>>>>>>>>>>>>>>>>
2. Meeting (회의)
In the meetings menu, you can manage scheduled meetings and view past meetings. (회의 메뉴에서 예약된 회의를 관리하고 지난 회의를 확인할 수 있습니다.)
2-1. How to invite participants (= students) (참석자 (= 학생) 초대하는 방법)
Below are instructions on how to send the Zoom link to our students in Point English. (아래 안내는 저희 포인트영어에서 수강생에게 줌 링크를 전달하는 방법입니다.)
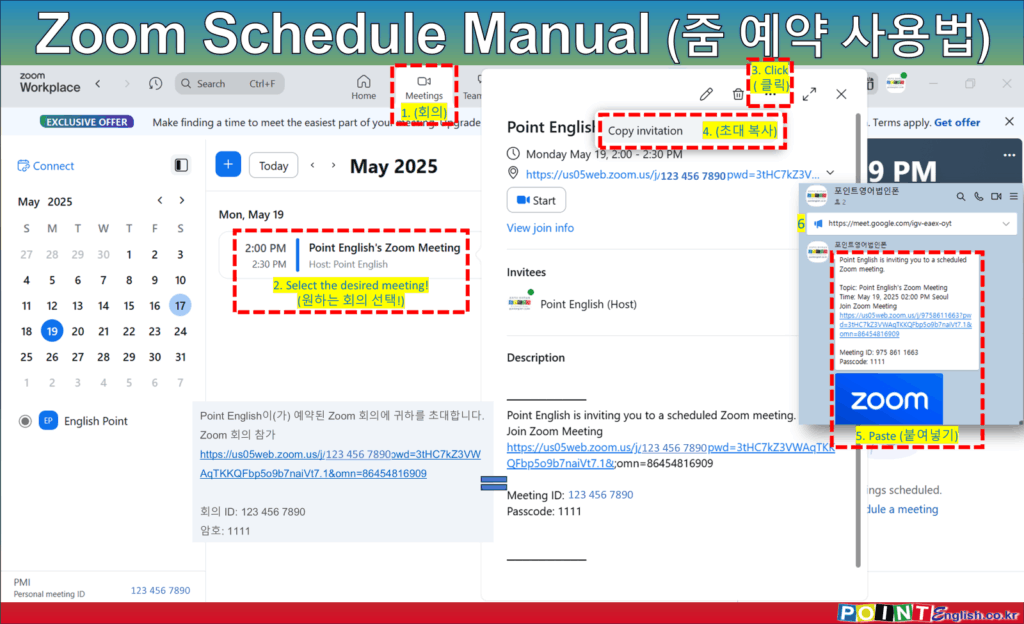
- Click ‘Meeting’ menu! (‘회의’ 메뉴 클릭!)
- Select the desired meeting! (원하는 회의 선택!)
- Click three dots! (점 세 개 클릭!)
- Click ‘Copy invitation’! (‘초대 복사’ 클릭!)
- Paste into messenger like KakaoTalk! (카카오톡과 같은 메신저에 붙여넣기!)
- Make the message as an announce. (해당 메시지를 공지로 만들기) – This is to use same link later and to find it easily. (나중에 동일한 링크를 사용하고, 쉽게 찾을 수 있도록 하기 위한 것입니다.)
2-2. How to Set up during a call (통화 중 세팅 방법)
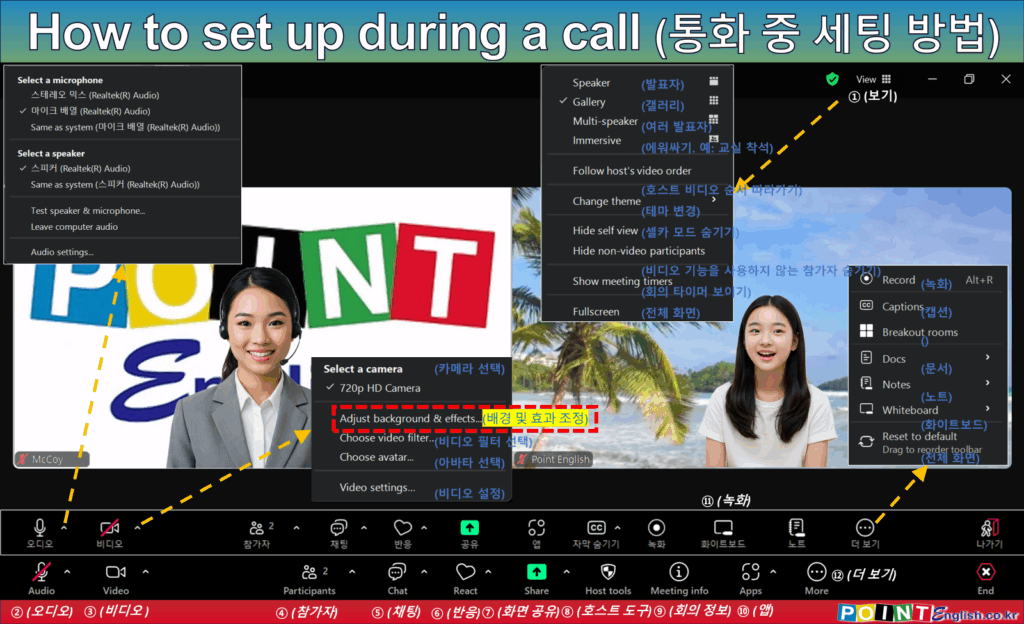
① View (화면 보기)
- Change the layout of the meeting screen, such as switching between gallery view and speaker view. (회의 화면의 레이아웃을 변경할 수 있으며, 갤러리 보기와 발표자 보기로 전환할 수 있습니다.)
- Speaker View (발표자 보기): Focus on the active speaker. (현재 발언 중인 참가자를 강조하여 표시합니다.)
- Gallery View (갤러리 보기): Show all participants in a grid format. The above View is this Gallery View. (모든 참가자를 격자 형태로 표시합니다. 위에 보이는 것이 이 갤러리 보기입니다.)
- Multi-speaker (여러 발표자)
- Change theme (테마 변경)
- Hide self view (셀카 모드 숨기기)
- Hide non-video participants (비디오 기능을 사용하지 않는 참가자 숨기기)
- Show / Hide meeting timer (회의 타이머 보기 / 숨기기)
- Fullscreen (전체 화면): Expand the meeting window to full screen. (회의 창을 전체 화면으로 확장합니다.)
② Audio & Audio Setting (오디오와 오디오 설정)
- Manage microphone and speaker settings. (마이크 및 스피커 설정을 관리할 수 있습니다.)
- Mute/Unmute (음소거/음소거 해제): Toggle microphone on or off. (마이크를 켜거나 끌 수 있습니다.)
- Select Microphone (마이크 선택): Choose an input device for audio. (오디오 입력 장치를 선택할 수 있습니다.)
- Select Speaker (스피커 선택): Choose an output device for audio. (오디오 출력 장치를 선택할 수 있습니다.)
- Test speaker & microphone (오디오 테스트): Check microphone and speaker functionality. (마이크 및 스피커 기능을 테스트할 수 있습니다.)
- Leave computer audio (컴퓨터 오디오 나가기)
- Audio settings… (오디오 설정…)
- Speaker Volume (스피커 볼륨 조절)
- Microphone Volume (마이크 볼륨 조절)
- Zoom background noise removal (Zoom 배경 소음 제거)
- Ringtones and notifications (벨소리 및 알림)
③ Video & Video settings (비디오와 비디오 설정)
- Control camera settings and video preferences. (카메라 설정 및 비디오 환경을 조정할 수 있습니다.)
- Start/Stop Video (비디오 시작/중지): Toggle camera on or off. (카메라를 켜거나 끌 수 있습니다.)
- Select Camera (카메라 선택): Choose a camera device. (사용할 카메라 장치를 선택할 수 있습니다.)
- Virtual Background (가상 배경): Apply a virtual background. (가상 배경을 적용할 수 있습니다.)
- Video Filters (비디오 필터): Add effects to the video feed. (비디오 화면에 필터 효과를 추가할 수 있습니다.)
- Choose Avatar… (아바타 선택): Replace your face with an avatar. (내 얼굴을 아바타로 대체할 수 있습니다.)
- Video Setting (비디오 설정): Options like ‘Mirror my video’, ‘Always display participant names on their video’ (‘내 비디오 미러링’, ‘비디오에 참가자 이름 항상 표시’ 등의 옵션)
④ Participants & Manage Participants (참가자와 참가자 관리)
- View and manage meeting participants. (회의 참가자를 확인하고 관리할 수 있습니다.)
- View Participants (참가자 보기): Show a list of all attendees. (모든 참석자의 목록을 표시합니다.)
- Invite & Copy invite link (초대… & 초대 링크 복사) Mute all participants. (모든 참가자의 마이크를 음소거합니다.)
⑤ Chat (채팅)
- Open Chat window. (채팅 창을 엽니다.)
- Send messages to participants. (참가자에게 메시지를 보낼 수 있습니다.)
- Public Chat (공개 채팅): Send messages to all participants. (모든 참가자에게 메시지를 보낼 수 있습니다.)
- Private Chat (개인 채팅): Send messages to specific participants. (특정 참가자에게 개인 메시지를 보낼 수 있습니다.)
- File Sharing (파일 공유): Share documents and images. (문서 및 이미지를 공유할 수 있습니다.)
⑥ React (반응)
- Express reactions during the meeting. (회의 중 반응을 표현할 수 있습니다.)
- Raise Hand (손 들기): Indicate a request to speak. (발언 요청을 나타낼 수 있습니다.)
- Emoji Reactions (이모지 반응): Send thumbs up, clapping, etc. (엄지 척, 박수 등의 이모지 반응을 보낼 수 있습니다.)
- Share your screen or specific applications. (화면 또는 특정 애플리케이션을 공유할 수 있습니다.)
- Share Entire Screen (전체 화면 공유): Share the entire desktop. (전체 데스크톱 화면을 공유합니다.)
- Share Specific Window (특정 창 공유): Share only a selected application. (선택한 애플리케이션만 공유합니다.)
- Whiteboard (화이트보드): Use a digital whiteboard for collaboration. Select the center ‘Documents’ tab at the top of the sharing pop-up page! (디지털 화이트보드를 사용하여 협업할 수 있습니다. 공유 팝업 페이지 상단에서 가운데 ‘문서’ 탭 선택!)
- You can find this in the bottom Tool box or the below ‘⑫ More’ below depending on versions. (버전에 따라 하단 도구 모음 상자에 있을 수도 있고, 아래 ‘⑫ 더 보기’에 있을 수도 있습니다.)
- Advanced sharing options (고급 공유 옵션): Select ‘Who can share?”! (누가 공유할지? 선택!)
⑧ Host Tools (호스트 도구)
- Manage meeting settings as the host. (호스트로서 회의 설정을 관리할 수 있습니다.)
- Mute Participants (참가자 음소거): Mute individual or all participants. (개별 참가자 또는 모든 참가자를 음소거할 수 있습니다.)
- Breakout Rooms (소그룹 회의실): Create separate rooms for discussions. (토론을 위한 별도의 회의실을 만들 수 있습니다.)
- Recording (녹화): Record the meeting. (회의를 녹화할 수 있습니다.)
- Point English teachers help students record all the time by setting it to ‘Record to computer’ instead of “Request to computer”. (포인트영어 선생님들은 ‘컴퓨터에 녹화 요청’ 대신에 ‘컴퓨터에 녹화’로 설정하여 수강생이 항시 녹화할 수 있도록 돕습니다.)
⑨ Meeting Info (회의 정보)
- View meeting details. (회의 정보를 확인할 수 있습니다.)
- Meeting ID (회의 ID): Display the meeting ID. (회의 ID를 표시합니다.)
- Password (비밀번호): Show the meeting password. (회의 비밀번호를 표시합니다.)
- Invite Link (초대 링크): Copy the meeting invite link. (회의 초대 링크를 복사할 수 있습니다.)
⑩ Apps (앱)
- Access integrated apps within Zoom. (Zoom 내에서 통합된 앱을 사용할 수 있습니다.)
⑪ Record (녹화)
- Access integrated apps within Zoom. You can find this in the below ‘⑫ More’ below depending on versions.(회의 녹화를 시작할 수 있습니다. 버전에 따라 아래 ‘⑫ 더 보기’에 있을 수도 있습니다.)
⑫ More (더 보기)
- Access additional settings and features. (추가 설정 및 기능을 확인할 수 있습니다.)
- Live Streaming (라이브 스트리밍): Stream the meeting to YouTube or Facebook. (회의를 YouTube 또는 Facebook으로 스트리밍할 수 있습니다.)
- Security Settings (보안 설정): Adjust security preferences. (보안 설정을 조정할 수 있습니다.)
- Some versions have important features here: recording, captioning, and whiteboarding. (일부 버전은 중요한 기능인 녹화, 캡션, 화이트보드 기능이 여기에 있습니다.)
⑬ End (나가기)
- Leave or end the meeting. (회의를 나가거나 종료할 수 있습니다.)
>>>>>>>>>>>>>>>>>>>>>>>>>>>
3. Team Chat (팀 채팅)
Communicate with team members via instant messaging. (팀원들과 즉시 메시지를 주고받습니다.)
① Direct messages (개인 메시지): Send private messages to specific users. (특정 사용자에게 개인 메시지를 보냅니다.)
② Group chats (그룹 채팅): Create chat rooms for team discussions. (회의 전, 회의 중, 회의 후 전용 그룹 채팅을 할 수 있습니다.)
Skip explanation of Other features due to rare use (기타 기능의 사용 빈도가 낮아 설명 생략.)
>>>>>>>>>>>>>>>>>>>>>>>>>>>
4. Scheduler (스케줄러)
Manage and organize upcoming meetings efficiently. (다가오는 회의를 효율적으로 관리하고 조직할 수 있습니다.)
Available to paid users only. (유료 사용자만 이용 가능합니다.)
>>>>>>>>>>>>>>>>>>>>>>>>>>>
5. Docs = Documents (문서)
Store and access shared documents within Zoom. (Zoom 내에서 공유된 문서를 저장하고 액세스합니다.)
5-1. Whiteboard (화이트보드)
Depending on your version, you’ll see this menu next to the ‘Documents’ menu. (버전에 따라서 ‘문서’ 메뉴 옆에 이 메뉴가 보입니다.)
Use a digital whiteboard for brainstorming and collaboration. (브레인스토밍 및 협업을 위한 디지털 화이트보드를 사용합니다.)
5-2. Apps (앱)
- Depending on your version also, you’ll see this menu next to the ‘Documents’ menu. (역시 버전에 따라서 ‘문서’ 메뉴 옆에 이 메뉴가 보입니다.)
- Integrate other applications with Zoom. (Zoom과 다른 애플리케이션을 통합합니다.)
- Examples of apps that are installed by default (기본으로 설치되어 있는 앱의 예시): Timer (타이머), Music (음악), Virtual Backgrounds (가상 배경) etc.
>>>>>>>>>>>>>>>>>>>>>>>>>>>
6. More (더 보기)
Access additional settings and features. (추가 설정 및 기능을 확인합니다.)
6-1. Clip (클립)
Save important meeting moments for quick access later. (회의 중 중요한 순간을 저장하여 나중에 빠르게 확인할 수 있습니다.)
6-2. Note (노트)
Create and store notes related to meetings. (회의와 관련된 노트를 작성하고 저장할 수 있습니다.)
6-3. Mail (메일)
Send and receive emails within Zoom for better team communication. (Zoom 내에서 이메일을 주고받아 팀 커뮤니케이션을 개선합니다.)
>>>>>>>>>>>>>>>>>>>>>>>>>>>
7. Frequently Asked Questions (자주 묻는 질문)
Q1. Can I use Zoom without an account? (계정 없이 Zoom을 사용할 수 있나요?)
A1. Yes, you can join meetings without an account, but hosting requires one. Also participant has to install Zoom app in the device. (네, 계정 없이 회의에 참가할 수 있지만, 회의를 주최하려면 계정이 필요합니다. 또한 해당 장치에 줌 앱은 설치되어 있어야 합니다.)
Q2. How do I record a meeting? (회의를 녹화하려면 어떻게 하나요?)
A2. Click the “Record” button during a meeting. Only hosts can record unless permission is granted. (회의 중 “녹화” 버튼을 클릭하세요. 호스트만 녹화할 수 있으며, 권한이 부여되면 참가자도 녹화할 수 있습니다.)
Q3. Can I use Zoom on multiple devices? (Zoom을 여러 기기에서 사용할 수 있나요?)
A3. Yes, but you can only be active on one device at a time. And please remember, if your teacher share the teacher’s screen, smartphones are hard to read due to too small screen. (네, 하지만 한 번에 하나의 기기에서만 활성화할 수 있습니다. 그리고 선생님 화면을 공유해서 볼 경우 스마트폰은 화면이 너무 작아서 가독성이 떨어진다는 점은 유의해 주세요.)
…
…
↓↓↓ 국내 최저가 수준의 포인트영어 수강료 확인하고, 무료 레벨테스트 신청하기 ↓↓↓