1 and 2 are the default settings, and 3 is how to use the app. (1과 2는 기본 설정이고 3번이 사용 방법입니다.)
This setting is for recording sound coming out of the computer through the speakers. Recording sound entering the computer from outside is set by default. (이 설정은 컴퓨터에서 스피커를 통해 나오는 소리를 녹음하기 위한 설정입니다. 밖에서 컴퓨터로 들어가는 소리 녹음은 기본으로 설정되어 있습니다.)
Contents (목차)
1. Default Setting 1 – To allow app to access microphone. (기본 설정 1 – 앱이 마이크에 접근할 수 있도록 허용하기.)
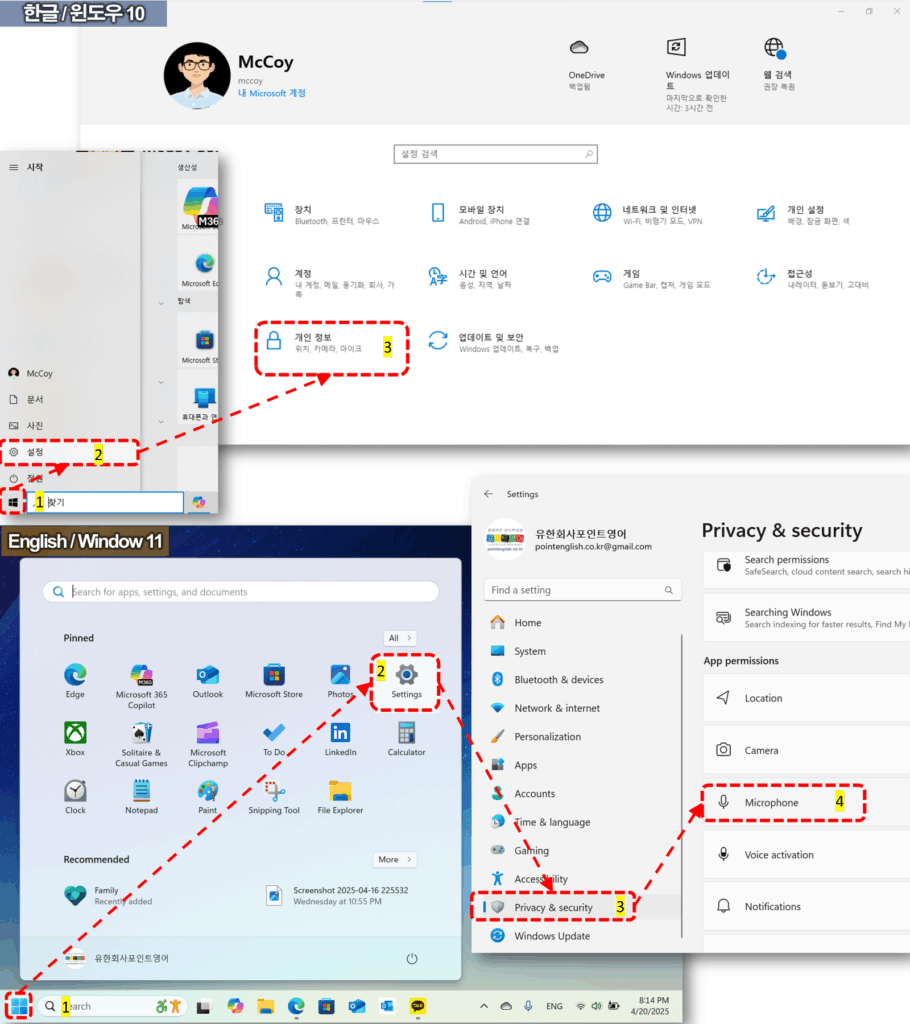
- Click the window icon in the bottom left corner of your computer screen!(컴퓨터 스크린 좌측 하단의 윈도우 아이콘 클릭!)
- Click Settings! (설정 클릭!)
- Select [Privacy & security] menu! ([개인 정보] 메뉴 선택!
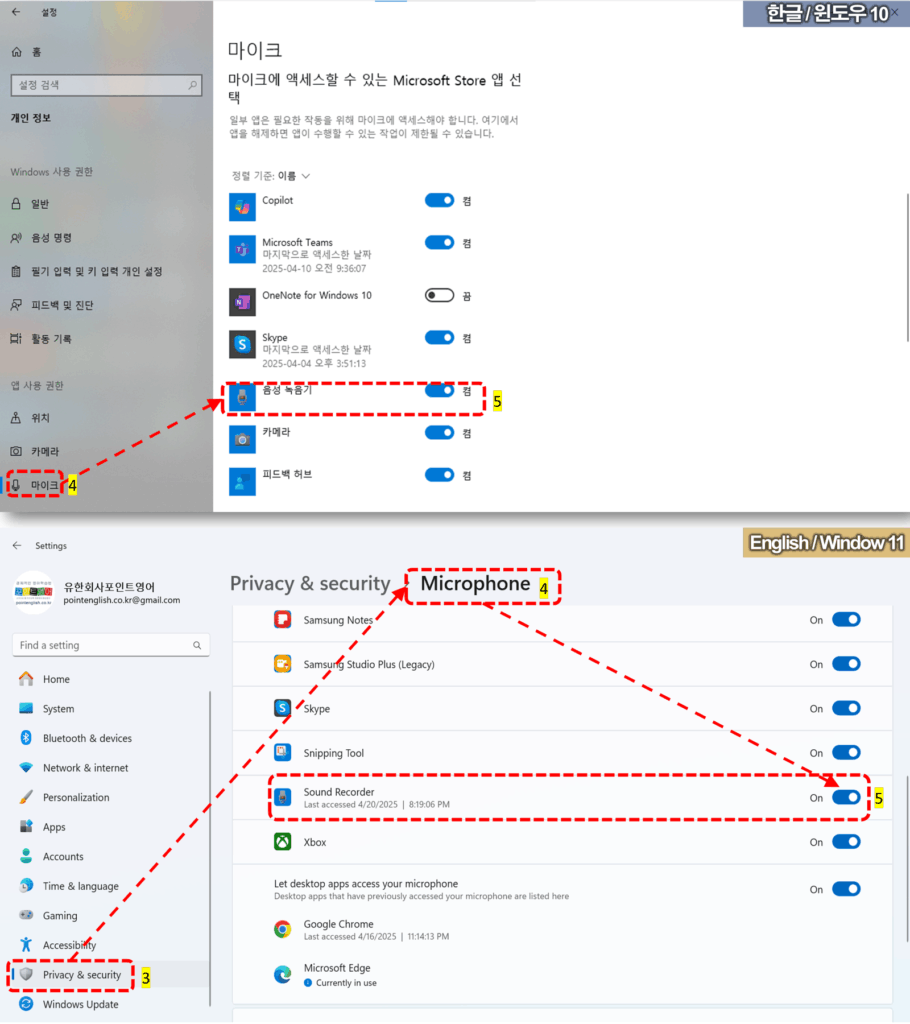
- Select [Microphone] tab! ([마이크] 탭 선택!)
- Turn the right side of Sound Recorder to ‘On’ (음성 녹음기 오른쪽을 ‘켬’으로 바꾸기)
>>>>>>>>>>>>>>>>>>>>>>>>>>>>>>>>>>>>>>>>>>>>>>>>>>>>>>>>>>>>>>>>>>>>>>>>>>>>>>>>>>>>>>>>>>>>>
2. Default Setting 2 – To allow app to access microphone. (기본 설정 2 – 스테레오 믹스로 소리입력 장치 변환)
Windows 11 may not need to do this, just go straight to number 3 and set it up when your computer won’t record sound. (윈도우 11은 이 작업이 필요 없을 수도 있습니다. 바로 3번으로 갔다가 컴퓨터 소리가 녹음이 안 될 때 설정해 주세요.)
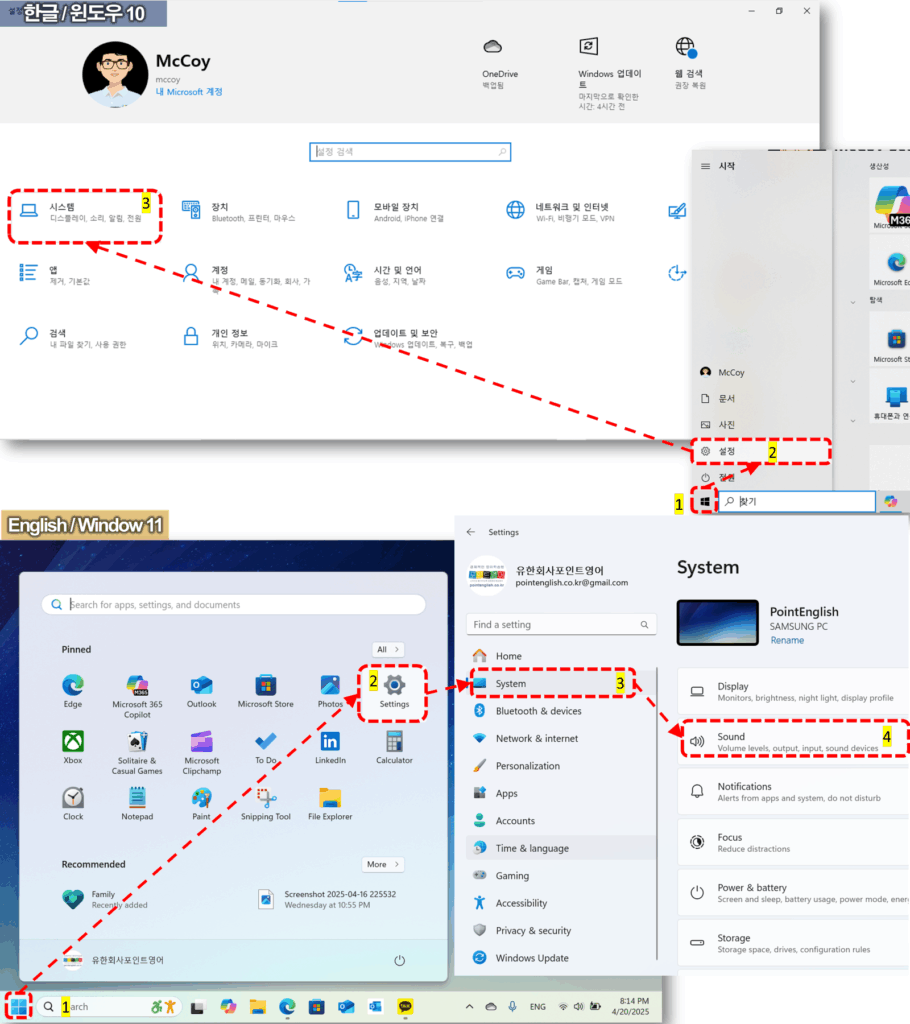
- Click the window icon in the bottom left corner of your computer screen!(컴퓨터 스크린 좌측 하단의 윈도우 아이콘 클릭!)
- Click Settings! (설정 클릭!)
- Select [System] menu! ([시스템] 메뉴 선택!
- Select [Sound] tab! ([소리] 탭 선택!)
- Click [More sound setting] icon! ([사운드 제어판] 클릭!)
- Select [Recording] tab! ([녹음] 탭 선택!)
- Select [Stereo Mix] and right-click! ([스테레오 믹스] 선택하고 마우스 우클릭!
- 7-1. If you don’t see Stereo Mix, right-click on the white background under the [Recording] tab. Check ‘Show Disabled Devices’! (만일 Stereo Mix가 보이지 않으며 [녹음] 탭 아래 흰 바탕에서 마우스 우클릭! 사용할 수 없는 장치 표시 체크!)
- Click [Enable]! ([사용] 클릭!)
- Click [OK]! ([확인] 클릭!)
- If you select Stereo Mix as the input device, the sound from inside your computer will be recorded, and if you select Microphone, the sound from outside will be recorded. (입력 장치를 스테레오 믹스를 선택하면 컴퓨터의 내부의 소리가, 마이크를 선택하면 외부의 소리가 녹음 됨.)
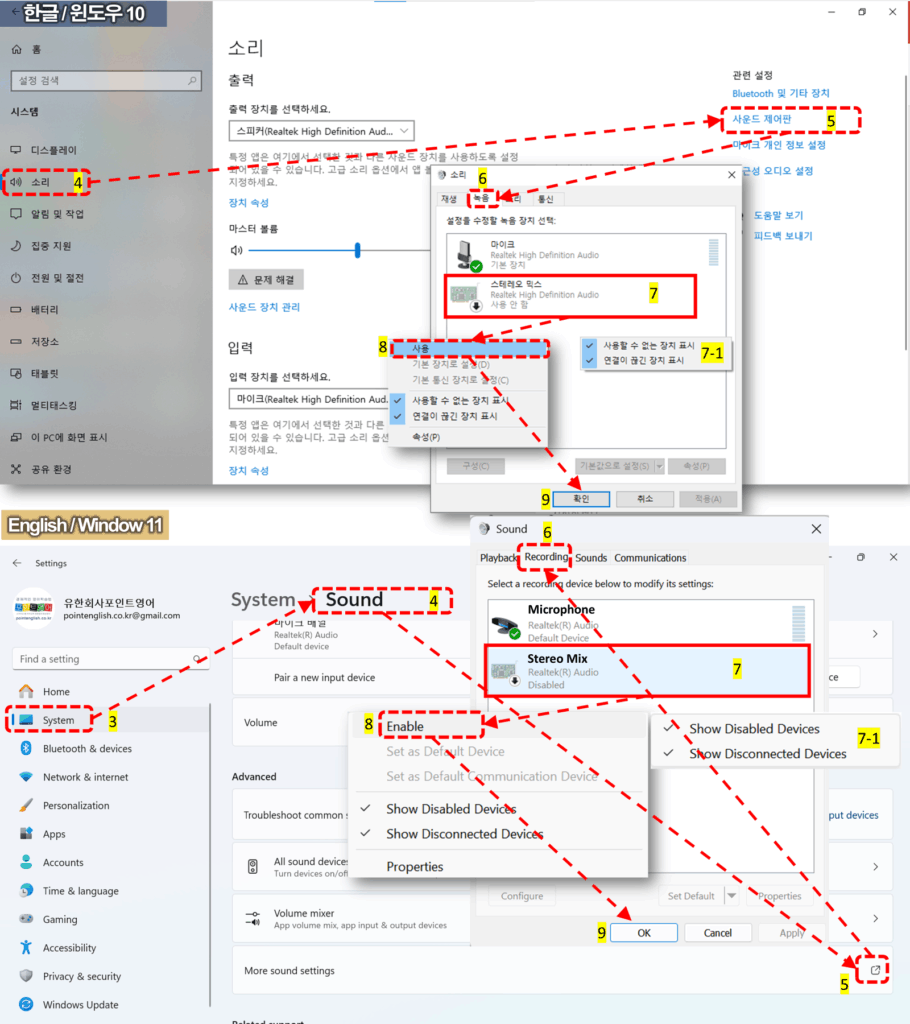

Tip: Windows 11 may record both internal and external sounds without this process). For Windows 10, to record both internal and external sounds, you need to connect a separate headset and record. (윈도우 11은 이 과정없이 내부와 외부 소리가 모두 녹음될 수도 있습니다. 윈도우 10의 경우 내부와 외부 소리를 모두 녹음하기 위해서는 별도의 헤드셋을 연결하고 녹음을 해야 합니다.)
>>>>>>>>>>>>>>>>>>>>>>>>>>>>>>>>>>>>>>>>>>>>>>>>>>>>>>>>>>>>>>>>>>>>>>>>>>>>>>>>>>>>>>>>>>>>>
3. To use Sound Recorder in Window (윈도우에 있는 음성 녹음기 사용하기)
3-1. How to open Sound Recorder and record (음성 녹음기 열기와 녹음하기 방법)
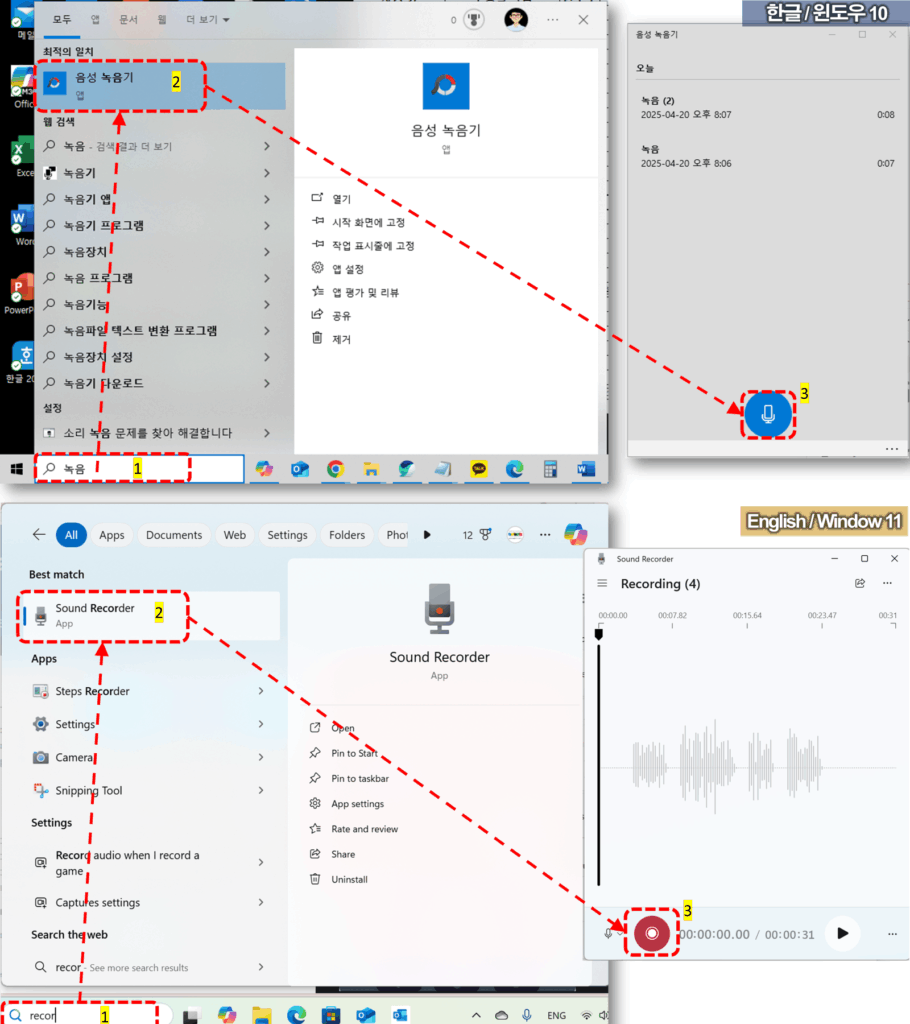
- Search for ‘Record’ in the search bar at the bottom left of your computer screen! (컴퓨터 화면 좌측 하단의 검색 창에서 ‘녹음’을 검색!)
- Select ‘Sound Recorder’ app! (음성 녹음기 앱 선택!)
- Click the Record button to start recording! (녹음을 시작하기 위해서는 녹음 버튼을 클릭!)
- To stop recording, click the Record button once again! (녹음을 중단하기 위해서는 녹음 버튼을 한 번 더 클릭!)
…
1-2. How to download recording file (녹음 파일 다운로드 하기)
- Maximize Sound Recorder app window to see a list of your recording files. (음성 녹음기 앱 창을 최대화하면 녹음 파일 목록을 볼 수 있습니다.)
- Select the desired file, right-click! (원하는 파일을 선택하고, 마우스 우클릭!.)
- Or Click the three dots in the top or bottom right corner of the recording window! (또는 녹음 창의 오른쪽 상단 또는 하단에 있는 점 세 개 클릭!)
- Select [Show in folder]! ([파일 위치 열기] 클릭!)
…
1-3. Setting Recording file format in Window 11 (윈도우 11에서 녹음 파일 포맷 설정하기)
Unfortunately, this feature is not supported on Windows 10. If you are a Windows 10 user, please go to 1-4 below. (아쉽게도 윈도우 10에서는 이 기능을 지원하고 있지 않습니다. 윈도우 10 사용자께서는 아래 1-4로 이동하시기 바랍니다.)
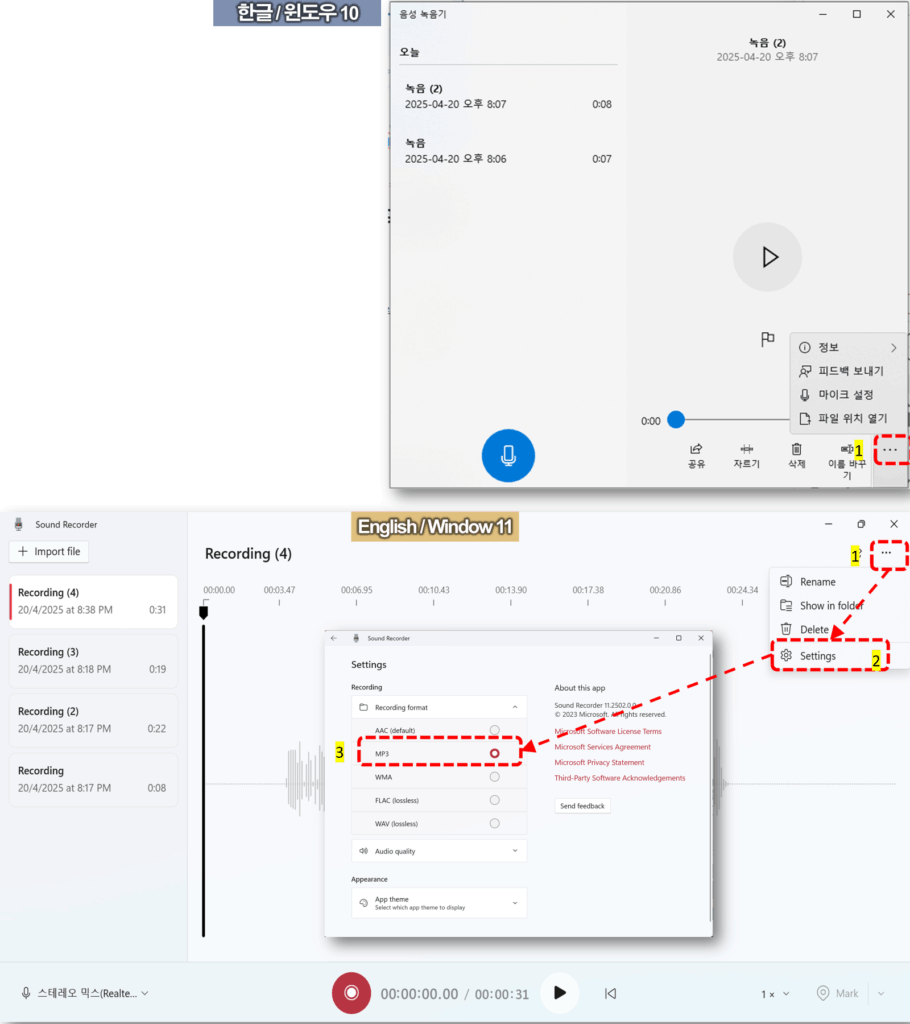
- Click the three dots in the top right corner of the recording window! (녹음 창의 오른쪽 상단에 있는 점 세 개 클릭!)
- Select [Setting]! ([설정] 선택!)
- Select MP3 under Recording format! (녹음 포맷 아래 MP3 선택!)
…
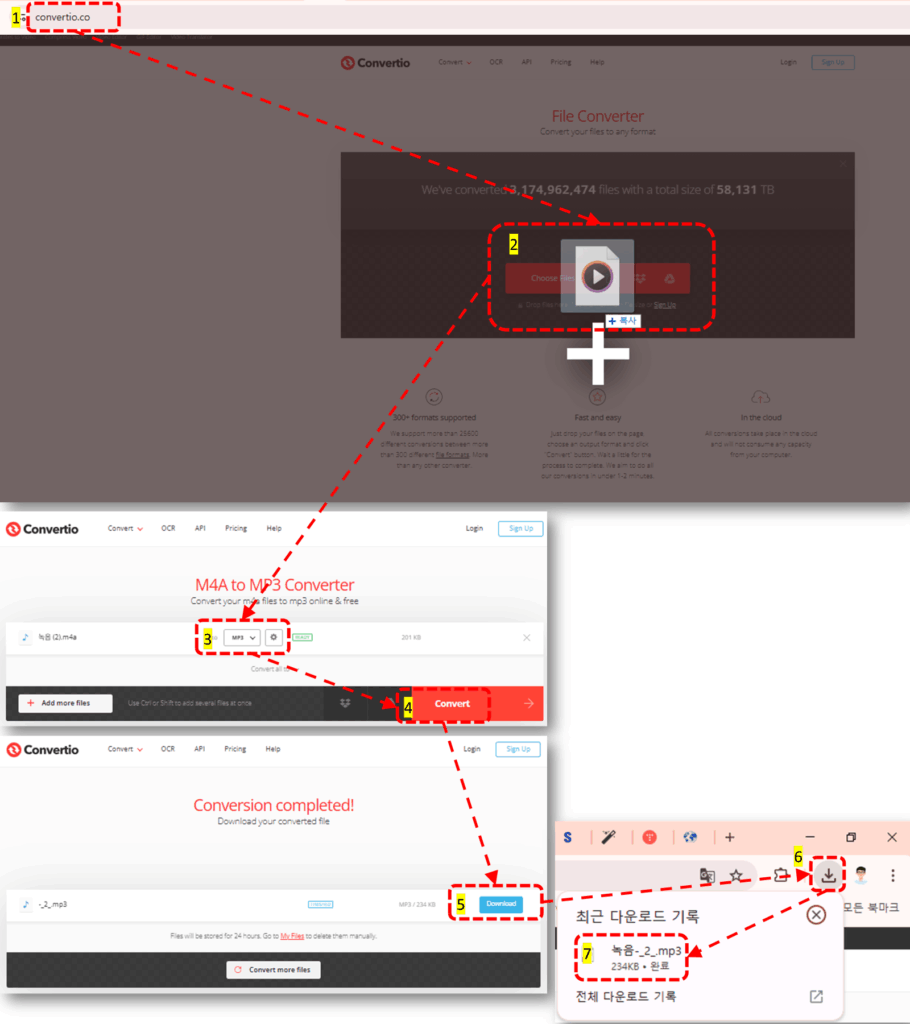
1-4. Convert M4A files to MP3 (M4A 파일을 MP3로 변환하기)
Click the below link and visit the site. Then you can convert to MP3 without Installing any programs or Signing in. (아래 링크를 눌러 해당 사이트에 가시면 프로그램 설치나 로그인 없이 MP3로 변환이 가능합니다.)
- Search for convertio or click the link above to go to the site! (convertio를 검색하거나 위의 링크를 눌러 해당 사이트로 이동!)
- Tap [Choose File] to browse for the file, or drag and drop it from Windows Explorer. ([파일 선택]을 눌러 파일을 찾거나, 윈도우 탐색기에서 끌어다 놓습니다.)
- Select the file format (MP3) you want to convert! (변환하려고 하는 파일 형태(MP3)를 선택!)
- Click [Covert] button! ([Convert] 버튼 클릭!)
- When the message ‘Conversion completed!’ is prompted, Click [Download]! (‘Conversion completed!’ 메시지가 보이면 [Download] 클릭!
- Click the [Download] icon in the top right corner of your web browser! (웹 브라우저 우측 상단의 [다운로드] 아이콘 클릭!)
- Select the desired file from the download list! (다운로드 목록에서 원하는 파일 선택!)
…
…
↓↓↓ 국내 최저가 수준의 포인트영어 수강료 확인하고, 무료 레벨테스트 신청하기 ↓↓↓